
If your electrician, HVAC installer, or home inspector told you that you need a 200 amp service upgrade, you’re probably wondering what that involves and what it costs. Here’s the straight answer from a licensed Minnesota electrician.
What Does a 200 Amp Upgrade Cost?
| Component | Cost Range | Notes |
|---|---|---|
| 200A Panel + Breakers | $1,500 – $2,500 | Eaton or Square D panel with 30–40 circuit spaces |
| Meter Base Replacement | $400 – $800 | Often required by your electric co-op during upgrade |
| Service Entrance Cable | $300 – $800 | New SE cable from meter to panel if existing is undersized |
| Weather Head & Mast | $200 – $500 | Required if mast is damaged or too short for new cable |
| Grounding System | $200 – $600 | Ground rods, water pipe bond, intersystem bonding |
| Permit & Inspection | $80 – $150 | Minnesota state electrical permit — we handle this |
| Labor | $800 – $1,500 | Typically 6–10 hours of work |
| Total Installed | $2,500 – $4,500 | |
Why Do You Need 200 Amps?
Your home’s electrical service is like the main water pipe coming into your house — it limits how much you can use at once. Common reasons you need a 200A upgrade:
- Adding central air conditioning — A typical AC unit draws 20–30 amps on a dedicated circuit
- Installing an EV charger — Level 2 chargers need a 40–60A dedicated circuit
- Adding a hot tub or sauna — 40–50A dedicated circuit required
- Building a pole barn or workshop — Outbuildings need their own sub-panel fed from your main
- Finishing a basement or addition — More rooms = more circuits = more amperage needed
- Installing a standby generator — Transfer switches require adequate panel capacity
- Breakers keep tripping — You’re already overloading your 100A or 60A service
- Selling your home — Buyers and inspectors flag undersized service
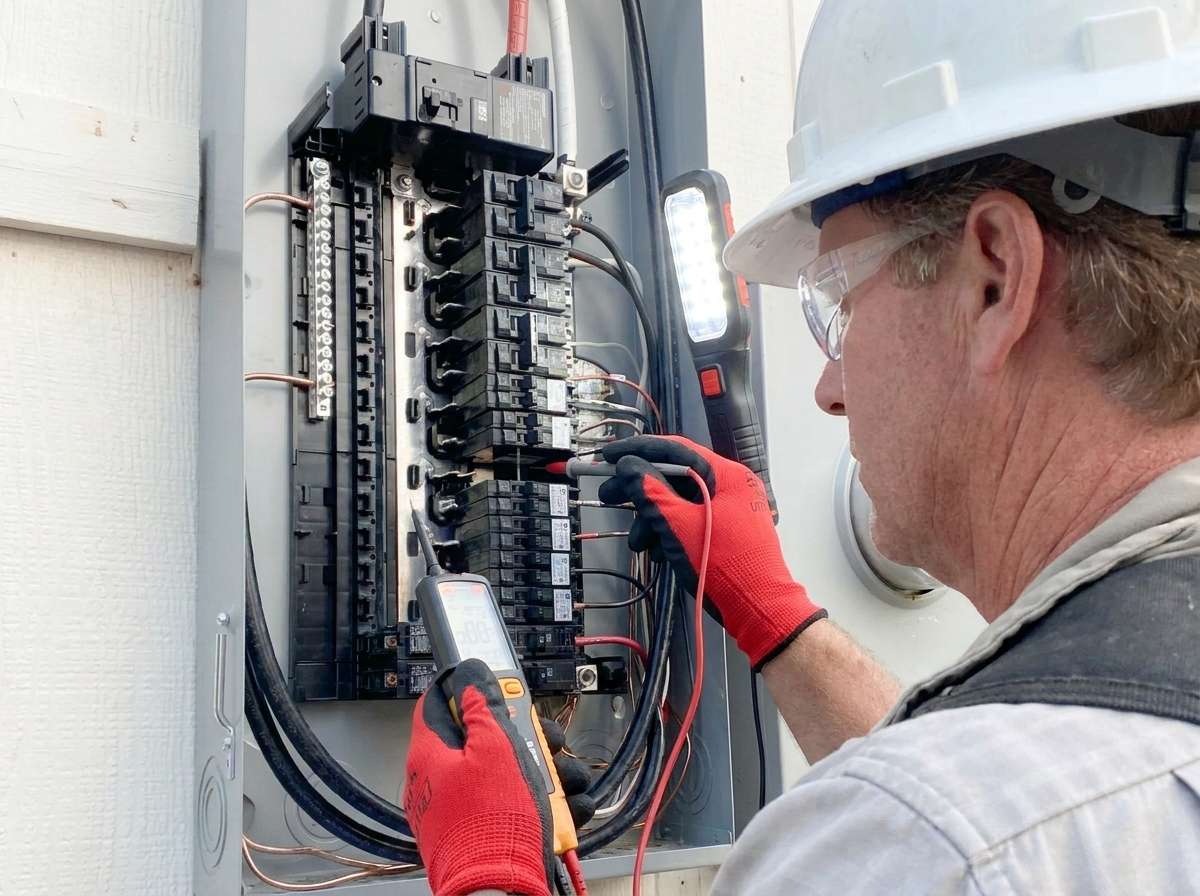
What Happens During the Upgrade
- We run a load calculation — Confirm that 200A is the right size (it almost always is for residential).
- We coordinate with your utility — Agralite, Kandiyohi Power, Runestone, or whoever serves your area needs to disconnect and later reconnect.
- Power off for 6–10 hours — We replace the meter base, service entrance cable, panel, and grounding in one day.
- State inspection — We schedule the inspection; an inspector verifies everything meets code.
- Utility reconnects — Your co-op installs the new meter and energizes your service.
Total timeline from scheduling to completion: Usually 1–2 weeks, depending on utility scheduling and permit processing.
100A vs. 200A: How to Know What You Have
Look at the main breaker in your panel — it will say “100” or “200” (or sometimes “60” in very old homes). If it says 100 or less and you’re adding any of the loads listed above, you need an upgrade.
Not sure? We offer free assessments. Call (320) 321-9699 and we’ll tell you what you have and whether you need an upgrade.
How We Size Your Service: NEC Load Calculations
Before we quote a 200-amp upgrade, we perform a formal NEC-compliant load calculation to make sure 200 amps is actually the right fit for your home. This is not guesswork — it is a code-required engineering calculation that accounts for every circuit in your home.
We calculate your service size using both methods defined in the National Electrical Code:
- NEC 220.82 Optional Method — The streamlined calculation for existing dwellings. Takes your total connected load, applies demand factors, and determines the minimum service size. Most residential upgrades qualify for this method.
- NEC 220 Part III Standard Method — The detailed, line-by-line calculation. We tally general lighting (3 VA per square foot per NEC Table 220.12), small appliance circuits (1,500 VA each per NEC 220.52), laundry circuits, cooking equipment (Table 220.55 demand factors), dryer loads (Table 220.54), HVAC, EV chargers, and every other fixed appliance.
The calculation determines your phase conductor sizing, neutral conductor sizing, and grounding electrode conductor (GEC) sizing under both 60 degrees C and 75 degrees C terminal ratings per NEC Table 310.16. For 200A residential services, we also evaluate whether the NEC 310.12 dwelling adjustment (the 83% rule) applies — which is what allows the common 4/0 aluminum or 2/0 copper service entrance conductor sizing you will see on most 200-amp residential panels.
Why does this matter to you? Because an undersized service will trip your main breaker under heavy load, and an oversized service wastes money on wire and equipment you do not need. The load calculation protects you either way — and your electrical inspector will require it before signing off on the permit.
Get Your Free Estimate
Bright Haven Electric provides transparent, itemized quotes for every service upgrade. We serve West Central Minnesota — Willmar, Marshall, Redwood Falls, Montevideo, Morris, Granite Falls, Glenwood, and surrounding communities.
Frequently Asked Questions
The actual electrical work takes 6–10 hours (one full day). Your power will be off for most of that time. Total project timeline from scheduling to completion is typically 1–2 weeks including utility coordination and inspection.
Yes. Minnesota state law requires an electrical permit from the Board of Electricity for all service upgrades. We pull the permit and schedule the state inspection as part of every project.
400A residential service is rare and expensive. For most homes, 200A is more than sufficient — even with an EV charger, AC, and a workshop. We may recommend a 400A service for large properties with multiple outbuildings or commercial operations.
Upgrading from an outdated panel and undersized service typically lowers your insurance premiums. It also satisfies insurer requirements that may have been flagged on your policy. We can provide documentation for your insurance company.
Generac Generator Installation Cost in Minnesota (2026)
Minnesota storms don’t ask permission. If you’re pricing a whole-home standby generator, here’s what Generac installations actually cost in West Central Minnesota — not the national averages you’ll find on HomeAdvisor, but real numbers from a licensed installer who does this work.
Generator Cost Breakdown
| Generator Size | Powers | Installed Cost Range |
|---|---|---|
| 10–14 kW | Essential circuits (furnace, fridge, lights, sump pump, well) | $5,000 – $8,000 |
| 16–22 kW | Most of the home (adds AC, electric range, dryer) | $7,500 – $12,000 |
| 24–26 kW | Whole-home coverage including electric heat, shop, EV charger | $10,000 – $15,000 |
| Commercial / 3-Phase | Farm operations, grain dryers, commercial buildings | $15,000 – $30,000+ |
Installed cost includes: the generator unit, automatic transfer switch, concrete pad, gas line connection (by a licensed plumber), electrical hookup, load management programming, permit, and state inspection.
What’s Included in the Installation?
- Generac generator unit — We install Generac Guardian and Protector series, the most popular residential standby generators in the US.
- Automatic transfer switch (ATS) — Detects a power outage and starts your generator within 10 seconds. No manual intervention needed.
- Concrete pad — Generator sits on a level pad at least 5 feet from any window or opening, per code.
- Fuel connection — Natural gas or LP (propane). We coordinate with your LP provider or gas utility.
- Electrical hookup — Wiring from the generator to your transfer switch and panel. May require a panel upgrade if your current panel can’t accommodate the transfer switch.
- Load management — We program the ATS to prioritize critical circuits if the generator can’t power everything at once.
- Permit and state inspection — Required in Minnesota. We handle everything.
- Startup and homeowner training — We walk you through operation, maintenance, and what to do if something goes wrong.
What Size Generator Do You Need?
The right size depends on what you want to power during an outage. Here’s how we determine it:
- We run a load calculation — We add up the wattage of every circuit and appliance you want backed up.
- We factor in starting loads — AC units and well pumps draw 3–5x their running wattage when starting. The generator needs to handle that surge.
- We right-size, not over-size — A generator that’s too big wastes fuel and money. A generator that’s too small can’t keep up. We calculate the sweet spot.
Most West Central MN homes with LP heat, a well, and central AC are best served by a 16–22 kW unit. If you have electric heat or a large shop, you may need 24 kW or larger.
Natural Gas vs. Propane
In West Central Minnesota, most homes use LP (propane) since natural gas service is limited outside of larger towns like Willmar and Marshall. LP generators work identically to natural gas units — you just need an adequate tank size. For a 22 kW generator running at half load, a 500-gallon LP tank provides roughly 4–5 days of continuous operation.
Rebates & Incentives
Check with your electric cooperative for available energy equipment incentives. Some co-ops offer rebates or favorable rate structures for members who install standby generators, especially if the generator includes load management to reduce peak demand.
Why Choose a Licensed Installer (Not a Plumber or HVAC Company)
A generator installation is primarily electrical work — the transfer switch, load management, and panel integration are the most complex and safety-critical parts. Plumbing and HVAC companies that also install generators often subcontract the electrical portion.
When you hire Bright Haven Electric, a licensed master electrician handles the entire electrical scope. The gas line work is done by a licensed plumber we work with regularly. One point of contact, one company responsible for the result.
Get a Quote for Your Home
Every installation is different. We’ll visit your property, run the load calculation, and give you a transparent, itemized quote — no hidden fees, no pressure.
Bright Haven Electric serves West Central Minnesota — Willmar, Marshall, Redwood Falls, Montevideo, Morris, Granite Falls, Glenwood, and surrounding communities.
Frequently Asked Questions
A typical residential installation takes 1–2 days. The concrete pad needs to cure for 24–48 hours before we set the generator, so there may be a gap between the pad pour and the electrical work.
Yes. Both an electrical permit (from the Minnesota Board of Electricity) and a gas permit are required. We handle all permitting and schedule the inspections.
Generac generators run a weekly self-test automatically. Beyond that, they need an oil and filter change every 200 hours or annually, whichever comes first. We offer maintenance service if you don’t want to handle it yourself.
Generac Guardian series generators run at approximately 66 dB at full load — about the same volume as a normal conversation. Newer models with the QuietConnect technology are even quieter.
Yes. Consumer Reports and real estate studies consistently show that a whole-home standby generator adds 3–5% to a home’s resale value. In rural Minnesota where power outages are more frequent, it’s especially valued by buyers.
Electrical Inspections for Home Sales in Minnesota
Selling your home? Electrical problems are one of the top reasons home sales fall through or buyers demand price reductions. A general home inspector will flag obvious issues, but they’re not an electrician — they miss things that a buyer’s electrician won’t.
Getting a pre-listing electrical inspection lets you fix problems on your terms, on your timeline, and at your price — instead of scrambling during a 10-day inspection window with a buyer threatening to walk.
What Kills Deals: The Top Electrical Issues Buyers Find
1. Outdated Electrical Panel
Federal Pacific, Zinsco, and Pushmatic panels are deal-killers. Buyers’ inspectors flag them immediately, and many buyers’ lenders won’t approve the mortgage until the panel is replaced. Cost to fix: $2,500–$4,500 for a full panel upgrade.
2. Aluminum Wiring
Homes built between 1965–1975 often have aluminum branch circuit wiring, which causes 55x more connection fires than copper. Buyers and their insurance companies will require remediation. AlumiConn connectors fix this without a full rewire — typically $2,000–$4,000 for a whole house.
3. Ungrounded (Two-Prong) Outlets
If your home still has two-prong outlets, buyers see it as a red flag — and they’re right. Upgrading to grounded three-prong outlets or adding GFCI protection is code-compliant, affordable, and removes the concern.
4. Knob-and-Tube Wiring
Still present in some pre-1950 Minnesota homes. Most insurance companies will not write a new homeowner’s policy on a house with active knob-and-tube wiring — which means the buyer can’t close. Replacement is the only option.
5. Missing GFCIs in Wet Locations
Current code requires GFCI protection in kitchens, bathrooms, garages, outdoors, basements, and laundry rooms. Homes built before 1990 often lack GFCI outlets in some or all of these locations. This is a cheap fix ($150–$300) that home inspectors always call out.
6. Unpermitted Electrical Work
DIY electrical work — the outlet in the garage, the sub-panel in the basement, the hot tub wiring — shows up on inspections. If it wasn’t permitted, the buyer may demand it be brought to code. We can inspect, correct, and obtain retroactive permits where possible.
What a Pre-Listing Electrical Inspection Covers
Our electrical safety inspection checks:
- Electrical panel condition, brand, and capacity
- Wiring type (copper, aluminum, knob-and-tube)
- Grounding and bonding
- GFCI and AFCI protection in required locations
- Outlet and switch condition
- Visible code violations
- Service entrance and meter condition
- Smoke and CO detector placement
You’ll receive a written report with findings, recommended repairs, and estimated costs — so you can decide what to fix before listing.
Truth-in-Housing & Rental Licensing Inspections
Some Minnesota cities require a Truth-in-Housing evaluation before a home can be sold. Others require rental licensing inspections for investment properties. Electrical systems are a major component of both evaluations. We can prepare your property to pass these inspections and provide documentation for your real estate agent.
Schedule Your Pre-Listing Inspection
Don’t wait for a buyer’s inspector to find the problems. A $200–$300 inspection now can prevent a $5,000+ price negotiation later.
Bright Haven Electric serves West Central Minnesota — Willmar, Marshall, Redwood Falls, Morris, Montevideo, Granite Falls, Glenwood, and surrounding communities.
Frequently Asked Questions
A standard residential electrical inspection typically costs $200–$300 depending on the size and age of the home. This is a fraction of the cost of a failed sale or price reduction.
Most inspections take 1–2 hours. You’ll receive a written report with findings and cost estimates within 24 hours.
Yes. We regularly provide compliance letters for insurance companies confirming that electrical issues (aluminum wiring, panel replacements, etc.) have been properly remediated. This is essential for buyers getting new homeowner’s insurance.
In most cases, fixing problems before listing is the better strategy. Disclosed electrical issues scare buyers and invite lowball offers. A completed repair with documentation shows the home is well-maintained and removes the concern entirely.
Emergency Electrician — West Central Minnesota
Electrical emergency? Call (320) 321-9699 now. Bright Haven Electric provides emergency electrical service across West Central Minnesota — Willmar, Marshall, Redwood Falls, Montevideo, Morris, Granite Falls, Glenwood, and surrounding communities.
When to Call an Emergency Electrician
Not every electrical problem is an emergency. But these situations require immediate professional attention — don’t try to fix them yourself:
- Burning smell from an outlet, switch, or panel — Turn off the breaker and call immediately. This indicates arcing or overheating.
- Sparking outlet or switch — Small blue sparks when plugging in are normal. Sustained sparking, yellow/white sparks, or sparks with a burning smell are an emergency.
- Partial power loss — If you lose power to half your house but the other half still works, you likely have a lost neutral — a dangerous condition that can damage appliances and start fires.
- Water near electrical equipment — Flooding, burst pipe, or roof leak near your panel, outlets, or wiring? Don’t touch anything. Call us.
- Storm damage to your service entrance — Downed mast, loose weather head, or damaged meter base after severe weather.
- Electrical shock from an appliance or fixture — Even a mild shock indicates a wiring fault that could electrocute someone.
- Downed power line on your property — Stay 35 feet away. Call 911 first, then your utility. Read our full safety guide.
- Panel or breaker is hot to the touch — A warm breaker or panel cover is a fire hazard.
What to Do Right Now
- If there’s a fire or immediate danger — Call 911 first.
- Turn off the main breaker if you can safely reach your panel and there’s no water or fire near it.
- Don’t touch any damaged wiring, wet outlets, or sparking equipment.
- Call us at (320) 321-9699 — Describe what happened and we’ll advise you on immediate safety steps while we dispatch.
Our Emergency Service Area
We provide emergency electrical service throughout West Central Minnesota, including:
- Willmar & Kandiyohi County
- Marshall & Lyon County
- Redwood Falls & Redwood County
- Montevideo & Chippewa County
- Morris & Stevens County
- Granite Falls & Yellow Medicine County
- Glenwood & Pope County
- Benson & Swift County
Don’t see your city? Call anyway — if you’re within our service area, we’ll be there.
What to Expect When You Call
- Immediate phone assessment — We’ll ask what happened and walk you through safety steps.
- Dispatch — Our licensed master electrician will head to your location.
- On-site diagnosis — We identify the root cause, not just the symptom.
- Transparent pricing — You’ll know the cost before we start any work. No pressure.
- Permanent repair — We fix it right the first time, to code, with a permit when required.
Why Choose Bright Haven Electric
- Licensed Master Electrician — Not an apprentice or handyman. Your emergency is handled by a qualified professional.
- Fully insured and bonded — Your property is protected.
- Local to West Central MN — Based in Milan, not dispatched from the Twin Cities.
- Transparent quoting — No surprise bills. You approve the cost before we work.
- Tesla Certified & Ring Authorized — Factory-trained on modern smart home and EV systems.
Frequently Asked Questions
Emergency service rates vary depending on the time and scope of work. We’ll give you a clear price before starting any repair — no hidden fees. Call (320) 321-9699 to discuss your situation.
Response time depends on your location within our service area. For communities within 30 minutes of Milan, MN, we can typically respond quickly. Call us and we’ll give you an estimated arrival time.
Yes. Partial power loss usually indicates a lost neutral at your service entrance or a failed main breaker. This condition can send 240V to 120V circuits and damage your appliances. Turn off sensitive electronics and call us immediately.
Turn off the main breaker if you can safely do so. If the smell is strong or you see smoke, leave the house and call 911 first. Then call us at (320) 321-9699. A burning smell means active arcing or overheating — this is a fire in progress.
How Much Does an Electrical Panel Upgrade Cost in Minnesota?
If you’re getting quotes for a panel upgrade, you want a straight answer — not a sales pitch. Here’s what electrical panel upgrades actually cost in West Central Minnesota in 2026, broken down by the type of work involved.
Quick Cost Summary
| Service | Typical Cost Range | What’s Included |
|---|---|---|
| 100A → 200A Panel Upgrade | $2,500 – $4,500 | New 200A panel, breakers, meter base, utility coordination, permit, inspection |
| Panel Replacement (Same Amperage) | $1,800 – $3,000 | Replace outdated/recalled panel with modern equivalent, new breakers |
| Sub-Panel Addition | $1,200 – $2,500 | New sub-panel for garage, pole barn, or workshop |
| Meter Base / Mast Replacement | $800 – $2,000 | Weather head, mast, meter base — often required by utility during upgrade |
| AFCI/GFCI Breaker Retrofits | $50 – $100 per circuit | Upgrade individual breakers to meet current NEC code |
These are real ranges from our completed projects in Willmar, Marshall, Redwood Falls, and surrounding areas. Your actual cost depends on several factors we’ll break down below.
What Affects the Price?
1. Your Current Panel Brand
If you have a Federal Pacific, Zinsco, or Pushmatic panel, your upgrade is more urgent — and potentially more complex. These panels have documented failure rates and known fire hazards. Insurance companies in Minnesota are increasingly requiring their replacement as a condition of coverage.
2. Utility Coordination
In West Central MN, your electric cooperative (Agralite, Kandiyohi Power, Runestone Electric, or Redwood Electric) needs to disconnect and reconnect service. Some co-ops require a new meter base during any panel upgrade. We handle all utility coordination — you don’t need to make those calls.
3. Permit & Inspection
All panel work in Minnesota requires a permit from the state Board of Electricity. Permit fees typically run $80–$150 depending on scope. We pull the permit, schedule the state inspection, and make sure everything passes the first time. Never hire an electrician who doesn’t pull permits — unpermitted panel work can void your homeowner’s insurance.
4. Additional Work Needed
Sometimes a panel upgrade uncovers other issues that need addressing:
- Grounding system — Older homes may need grounding electrode upgrades to meet current code
- Aluminum wiring connections — If you have aluminum branch circuit wiring, we’ll use AlumiConn connectors at the panel
- Service entrance cable — Deteriorated or undersized SE cable needs replacement
- Load calculations — Adding an EV charger, hot tub, or workshop? We size the panel to handle your actual needs, not just today’s load
Signs You Need a Panel Upgrade Now
- Breakers trip frequently, especially when running multiple appliances
- You’re adding a home EV charger, central AC, or hot tub
- Your panel is a Federal Pacific, Zinsco, or Pushmatic brand
- You still have a fuse box instead of breakers
- Your home insurance company is requiring an upgrade
- You smell burning or see discoloration on your panel cover
- You’re selling your home and the inspection flagged the panel
What to Ask Your Electrician Before Hiring
- “Are you pulling a state permit?” — The only correct answer is yes.
- “Is your quote all-inclusive?” — Watch for hidden costs for the meter base, utility fees, or inspection.
- “What brand panel do you install?” — We use Eaton and Square D. Avoid anyone installing off-brand panels.
- “Do you coordinate with the utility?” — You shouldn’t have to call the co-op yourself.
- “What’s the warranty?” — Panels carry a manufacturer warranty; labor should be warranted separately.
Real-World Example: Basement Outlet Project in Douglas County
Here is what a recent basement outlet and circuit addition project actually cost in Douglas County, Minnesota — broken down line by line so you can see exactly where the money goes:
| Line Item | Details | Cost |
|---|---|---|
| 20A GFCI Outlet — Water Softener Area | Existing wire in place, GFCI receptacle, cover plate, touch-up | $89.50 |
| 20A GFCI Outlet — Utility Area | 25 ft NM-B wire run from GE panel, new 20A breaker, receptacle | $198.36 |
| 20A Commercial-Grade Outlet — Sump Pump | 75 ft wire run, commercial duplex receptacle | $167.00 |
| 20A Dual-Function (AFCI/GFCI) Outlet — Kitchen Under-Sink | 15 ft MC cable (required in kitchen areas), dual-function breaker, 3/8 inch connectors. 1.75 hrs labor. | $269.98 |
| County Electrical Permit and Inspection | State-required permit, inspector coordination | $95.00 |
| Materials Markup (30%) | Standard industry markup on all electrical materials | Included |
| Project Total | $994.84 | |
Optional upgrades the homeowner could add:
- Upgrade any outlet to a quad receptacle (four plugs instead of two): +$32.14 per outlet
- Add a 20A switch on a 2-gang cover for a garbage disposal: +$33.76
This project shows why itemized quotes matter — the kitchen outlet alone cost $269.98 because it required MC cable (metal-clad, required in kitchen areas by NEC code), a dual-function AFCI/GFCI breaker, and specialty connectors. A per-outlet estimate from a national website would not account for those code-driven material requirements specific to your situation.
Get a Real Quote, Not a Guess
Every panel upgrade is different. We provide transparent, itemized quotes — you’ll see exactly what you’re paying for before we start. No hidden fees, no surprises.
Bright Haven Electric is a licensed, insured electrical contractor serving West Central Minnesota — Willmar, Marshall, Redwood Falls, Morris, Montevideo, Granite Falls, and surrounding communities.
Frequently Asked Questions
Most residential panel upgrades take 4–8 hours to complete. Your power will be off for most of that time. We schedule utility disconnection in advance so there are no delays.
Yes. Minnesota state law requires an electrical permit for all panel replacements and upgrades. We pull the permit and schedule the state inspection as part of every job.
In most cases, upgrading from an outdated or recalled panel lowers your insurance premium or removes a surcharge. Some insurers (State Farm, Farmers) won’t renew policies on homes with Federal Pacific or Zinsco panels.
If you have central AC, an electric dryer, an EV charger, or a workshop — you need 200 amps. Most modern Minnesota homes should have 200A service. We’ll run the load calculation and recommend the right size.
Contact us to discuss payment options. We also help identify available rebates and incentives from your local electric cooperative.
Minnesota is proud to be the Land of 10,000 Lakes, home to some of the most beautiful seasonal cabins, bustling resorts, and lakeside communities in the country. But behind the serene lake views and summer fun lies a critical safety responsibility that every resort owner, cabin host, and waterfront homeowner must face: waterfront dock electrical safety.
Water and electricity are a lethal combination. Over the years, faulty dock wiring has led to numerous cases of Electric Shock Drowning (ESD)—a silent hazard where electrical current leaks into the water around a dock, paralyzing a swimmer’s muscles and leading to drowning. To prevent these tragedies, the National Electrical Code (NEC) mandates strict guidelines under Article 555. Whether you operate a commercial resort on Green Lake or manage a private dock in Douglas County, understanding these standards is essential for safety, insurance compliance, and liability protection.
1. The Core Standard: Ground-Fault Protection (GFP)
In standard residential outlets, a standard GFCI breaker trips at 4 to 6 milliamperes (mA) to protect an individual touching an appliance. However, on commercial docks, marinas, and lakeshores, the electrical load is much larger, and standard residential breakers would experience constant “nuisance tripping” due to natural, minor capacitive leakage from long underwater runs.
To solve this, NEC Section 555.35 establishes a dual-tier protection standard:
- Feeder-Level Protection (30mA): The main feeder breaker supplying power to the dock structure must have Ground-Fault Protection (GFP) set to trip if current leakage exceeds 30mA. This acts as a master shield, cutting power before leaking voltage can create a paralyzing electrical field in the surrounding water.
- Individual Receptacle Protection (5mA): Any individual 15A or 20A receptacle on the dock (such as those used for boat lifts, battery chargers, or tools) must be equipped with dedicated 5mA Class A GFCI protection.
2. The Waterfront Material Checklist: Built to Endure
Waterfront electrical systems are subjected to continuous moisture, wave action, shifting ice, and physical impacts from boats. Standard residential electrical materials will degrade in months, causing hazardous current leakage. A safe dock requires industrial, marine-grade components:
Schedule 80 PVC Conduit
While standard Schedule 40 PVC is suitable for underground burial, any conduit exposed on a dock walkway, piling, or seawall is subject to physical damage from boats, jet skis, and winter maintenance. The NEC requires Schedule 80 PVC for all exposed locations, providing double the wall thickness to resist crushing and impact.
Watertight Receptacles (NEMA 4X / 6P)
Standard outdoor outlet covers do not protect receptacles from direct wave splashing. High-end installations utilize Leviton Wetguard or similar industrial-grade, watertight locking plugs and receptacles. These devices carry NEMA 4X and 6P ratings, ensuring a watertight seal even when submerged or sprayed by high-pressure hoses.
Accommodating Water Movement: LFNC & Marine Strain Reliefs
Floating docks rise and fall with seasonal water level changes. Rigid piping will snap under these forces. Code-compliant installations utilize Liquidtight Flexible Non-Metallic Conduit (LFNC) loop configurations. These loops must be fitted with marine-grade Heyco liquidtight strain reliefs to relieve tension on electrical terminals as the dock floats, swings, and shifts with wind and waves.
3. Safety Auditing & Megohmmeter Testing
How do you know if your dock is safe before guests jump in the water? A standard voltage meter will only show if power is active, not if current is leaking through nicked insulation underwater.
Bright Haven Electric utilizes specialized diagnostic testing to audit lakeshore systems:
- Megohmmeter (Megger) Testing: We apply high-voltage, low-current testing to underwater feeders. This measures the resistance of the wire insulation, identifying microscopic cuts, punctures, or degradation that would lead to current leakage under load.
- GFP Calibration: We test the response time and trip thresholds of your main 30mA GFP breakers to ensure they will trip in milliseconds during a ground fault.
- Equipment Grounding Path Test: We verify that a low-resistance copper grounding path is continuous from the furthest dock receptacle all the way back to the main service shore panel.
Frequently Asked Questions
While private residential docks are not subject to the strict commercial standards of NEC Article 555, Minnesota state rules require robust ground-fault protection (5mA Class A GFCIs) for all dock circuits. Durable conduit methods like Schedule 80 PVC or Liquidtight Flexible Non-Metallic Conduit (LFNC) are highly recommended to prevent hazardous current leakage.
Commercial docks and resort waterfronts are subject to regular state inspections. Bright Haven Electric highly recommends performing complete insulation (Megohmmeter) testing and GFP calibration annually, specifically at the start of each spring cabin opening season to catch any winter movement or ice damage.
Electric Shock Drowning (ESD) occurs when alternating current (AC) leaks from dock wiring or a boat into the surrounding water. This leakage creates an electrical field in the water. When a swimmer enters this field, the current passes through their body, causing muscle paralysis, making it impossible to swim or stay afloat, which leads to silent drowning.
Pole Barn Wiring Diagrams & Planning Layouts
Visual planning diagrams, feeder examples, and sub-panel layout concepts for Minnesota shops, outbuildings, and garages.
In our primary Pole Barn Electrical Service Guide, we covered the critical structural rules, capacity considerations, and permit requirements for wiring outbuildings. However, when it comes to the actual trenching, conduit runs, and sub-panel connections, nothing beats a clear visual roadmap.
This guide provides visual pole barn wiring diagrams for three common outbuilding setups we see in West Central Minnesota. Below, you’ll find planning blueprints for sub-panel configurations, underground feeder sizes, grounding systems, and specific workshop tool circuits. Whether you’re working with building inspectors in Willmar, Benson, Morris, or rural Redwood County, these layouts will help you understand the scope of work before your electrician arrives.
Important Disclaimer
- All diagrams and specifications in this guide are general planning examples only. They are intended to help property owners understand planning concepts and scope of work — they are not a substitute for a permitted electrical design or installation by a qualified electrician.
- Final design depends on your specific load calculation, conductor type, temperature rating, voltage drop, raceway fill, equipment terminal ratings, site conditions, and the adopted code cycle enforced by your inspector.
- In Minnesota, outbuilding electrical work should be properly permitted and inspected. Bright Haven Electric coordinates with the appropriate electrical inspector before work begins.
1. Feeder Trenching & Conduit Diagram
Before looking at sub-panels, the primary connection between your main residential panel, service disconnect, meter-main, or other property service equipment and your outbuilding must be properly designed. Below is a typical cross-section for an underground feeder conduit trench. Burial depth requirements vary by wiring method, voltage, and location — your inspector and installation details control the final requirement.
Minnesota Trenching Considerations
- Frost Depth: Minnesota winters freeze the ground 42 to 48 inches deep. While NEC burial depth for PVC conduit is often 18 inches, local inspectors commonly expect an expansion fitting where PVC emerges from underground and attaches to the building. This prevents winter ground heaving from cracking the conduit or pulling the sub-panel off the interior stud wall.
- Conduit vs. Direct Burial: Direct burial (UF-B cable) generally requires deeper cover and has limited protection from rocks, spade shovels, or rodents. Running individual wet-location-rated THWN-2 conductors inside Schedule 40 PVC conduit is significantly safer, has longer life expectancy, and allows you to pull larger conductors later if your workshop power demands increase. Long conduit runs, multiple bends, and future expansion plans may require larger conduit, pull boxes, or revised conductor sizing to comply with conduit-fill and pulling requirements.
- Four-Wire Feeder: A detached outbuilding sub-panel is typically fed with a four-wire feeder: two ungrounded (hot) conductors, one insulated neutral, and one equipment grounding conductor (EGC). The neutral and ground are bonded only at the main service equipment — not in the detached sub-panel. See NEC 250.32(B)(1).
2. Sub-Panel Neutral & Ground Separation Diagram
The most common reason DIY electrical installations fail inspection in Minnesota is the incorrect bonding of the neutral and grounding buses inside the outbuilding sub-panel. Under the National Electrical Code, the neutral bus in a detached outbuilding sub-panel must remain isolated from the equipment grounding conductors and panel cabinet. Detached buildings also generally require a disconnecting means at the structure — in many installations, a main breaker in the outbuilding panel serves this purpose.
Why must grounds and neutrals remain isolated? In your main electrical service equipment, neutrals and equipment grounds are bonded together at the service disconnect. However, in a detached structure, if you connect the neutral bus bar to the metal sub-panel case, you create a parallel return path for normal operating electricity. A portion of the return current will constantly flow through the equipment grounding conductor, metal raceways, and structural steel of the pole barn — causing unexpected voltage on metal surfaces, tripping GFCI breakers, and creating dangerous stray voltage in livestock facilities.
3. Three Standard Workshop Wiring Configurations
Here are planning layouts for three common outbuilding configurations we see throughout Kandiyohi, Swift, Stevens, and Redwood counties.
| Setup Type | Sub-Panel Size | Planning Example Feeder Size — Up to 150’ | Grounding Electrode Requirement | Best For |
|---|---|---|---|---|
| Basic Hobby Garage | 60 Amp, main breaker preferred (main-lug allowed only when disconnect rules are met) | #6 AWG Copper (in PVC) | Grounding electrode system, typically 2 ground rods | Hobby benches, basic lawn equipment, single table saws |
| The Mechanic’s Shop | 100 Amp (Main Breaker) | #2 AWG Copper or 1/0 Aluminum | Grounding electrode system, typically 2 ground rods | 240V air compressors, MIG/TIG welders, vehicle lifts |
| Agricultural/Commercial | 200 Amp (Main Breaker) | 4/0 AWG Copper or 250 kcmil Aluminum (typical) | Grounding electrode system + metal structure bonding + concrete-encased electrode, often called a Ufer, if present | Continuous heavy machinery, grain bins, vehicle fleets |
Planning Notes for All Configurations
- Load calculation required: Panel size should be selected after calculating expected loads — including heating, welders, compressors, vehicle lifts, lighting, EV charging, well pumps, grain-bin equipment, and future expansion.
- Feeder sizes are planning examples only. Final conductor sizing depends on load calculation, conductor material, insulation type, temperature rating, voltage drop, raceway fill, equipment terminal ratings, and inspector requirements.
- GFCI protection: Under NEC 210.8, garages, accessory buildings, outdoor locations, and many shop/outbuilding receptacles require GFCI protection. Newer NEC rules also extend GFCI protection to certain higher-amperage and 240V receptacles, including some 240V receptacles up to 50A depending on location and use. Welder and compressor receptacles should be reviewed during design to confirm the correct GFCI requirements with the electrician and inspector.
- Metal building bonding: Metal building components, structural steel, and other conductive systems may need to be bonded to the grounding system regardless of building size — not just 200A agricultural setups.
- Concrete-encased electrodes: If the outbuilding is being constructed with a new concrete foundation containing structural rebar, a connection to a concrete-encased electrode (often called a Ufer ground) per NEC 250.50 is required — this connection must be made before the concrete is poured. It is not optional when the electrode is present at the building.
- Surge protective devices: Current NEC rules require surge protection in certain dwelling-unit service or feeder situations, and outbuildings housing sensitive equipment — VFDs, tool battery chargers, LED drivers, or shop electronics — can benefit significantly from surge protection at the sub-panel. We recommend installing an SPD at the outbuilding panel as a best practice when appropriate, even when not strictly required for that specific installation.
- Detached-building disconnect clarification: Detached buildings generally require a disconnecting means at the structure. In many installations, a main breaker in the outbuilding panel serves this purpose. Main-lug panel designs with six or fewer breakers should be reviewed carefully with the inspector before installation because service disconnect rules and detached-building feeder disconnect rules are found in different NEC articles.
Setup A: The 60-Amp Basic Hobby Garage
Ideal for vehicle storage, seasonal workshops, and basic lawn care maintenance. This configuration utilizes a 60A panel fed from a 60A breaker at the home or property’s main electrical equipment. If using a main-lug-only panel, the design generally needs six or fewer circuit breakers to satisfy the detached-building disconnect rules under NEC 225.33 — otherwise, use a main breaker panel or install a separate disconnect.
Setup B: The 100-Amp Mechanic’s Workshop
Designed for heavy fabrication, restoration, and mechanical workshops. This setup handles high-load tools like stationary air compressors and professional welders running simultaneously.
Setup C: The 200-Amp Agricultural or Commercial Outbuilding
Designed for large shops, grain-bin support equipment, fleet maintenance, commercial storage buildings, and heavy machinery loads. This setup usually requires a detailed load calculation, larger feeder conductors, metal building bonding review, surge protection planning, and coordination with the electrical inspector before trenching or panel installation.
4. Outbuilding Grounding Electrode Layout
Per NEC 250.32, a detached outbuilding generally needs both an equipment grounding conductor (EGC) run with the feeder and a grounding electrode system at the building. The feeder EGC provides the low-impedance fault path needed for breaker operation, while the grounding electrode system connects the detached structure to earth and helps stabilize the electrical system during lightning, surges, and abnormal voltage conditions.
Dual Ground Rod Rule
Most detached outbuilding installations use two copper-clad or galvanized steel ground rods, unless a single grounding electrode is proven to have 25 ohms or less resistance to ground (which is rare in Minnesota’s variable soils). Each rod must be a minimum of 8 feet in length. The rods are typically driven flush with or below grade, or otherwise protected from physical damage, so clamps are not exposed to lawn equipment or frost movement.
8-Foot MinimumThe 6-Foot Stagger
To establish a broad, reliable electrical ground plane, the two ground rods must be spaced at least 6 feet apart. Driving them closer causes their spheres of influence to overlap, reducing the effectiveness of the grounding electrode system — especially in dry or sandy soil. A #6 AWG copper grounding electrode conductor is commonly run from the sub-panel ground bar to the rods, with any splices or connections made only by approved methods (irreversible compression connectors or exothermic welding per NEC 250.64(C)).
6-Foot Spacing“Whenever we inspect pole barns, we frequently see homeowners driving a single 8-foot copper rod or clamping their ground wire directly to the metal building frame without proper ground rods. This is a serious safety concern. If the metal building frame is not properly bonded to the equipment grounding system, a fault can leave metal parts energized or delay proper fault clearing. Ground rods are required, but they do not replace the equipment grounding conductor run with the feeder — both are needed for a safe installation.” — Chadwick Ferguson, Co-Owner, Bright Haven Electric
Local Outbuilding Electricians — West Central Minnesota
Bright Haven Electric LLC coordinates complete pole barn electrical planning, layout, trenching, wiring, and inspection coordination across West Central Minnesota. Our local office handles direct coordination with the appropriate electrical inspector so your workshop, storage shed, or commercial barn is ready for inspection.
We provide full-service outbuilding wiring in these communities:
Get an Inspected, Safe Pole Barn Layout
Avoid expensive rework or inspection failures. Let our licensed electricians plan and install your pole barn wiring according to current code requirements and site-specific inspection standards.
In a detached building sub-panel, keeping neutrals and grounds separate is required by code to prevent neutral return current from flowing through equipment grounding conductors, metal raceways, pipes, or structural steel. The bonding link must be removed, isolating the neutral bus from the panel cabinet.
For many common residential PVC conduit feeder installations, NEC Table 300.5 generally requires 18 inches of cover from the top of the conduit to finished grade, with deeper cover often required under driveways or vehicle traffic areas. Burial depth requirements vary by wiring method, voltage, and specific installation conditions — your inspector and installation details control the final requirement.
Most detached outbuilding sub-panels use two grounding electrodes (ground rods) unless a single rod is tested and proven to have 25 ohms or less resistance to ground. In practice, two 8-foot rods spaced at least 6 feet apart are commonly installed because soil resistance testing is rarely practical for typical residential and farm outbuildings in Minnesota.
Pole Barn & Outbuilding Wiring Guide
Sub-panel sizing, underground feeder runs, circuit planning, and NEC code requirements for pole barns, shops, and outbuildings in West Central Minnesota.
Every spring and summer across West Central Minnesota, property owners build pole barns, machine shops, detached garages, and agricultural outbuildings. The structure goes up fast — but the electrical service is where most projects stall, get quoted wrong, or end up with code violations that fail inspection. Pole barn wiring is not the same as house wiring. The distances are longer, the loads are heavier, the environment is harsher, and the NEC requirements are specific.
This guide covers what you need to know before the electrician arrives — and what a licensed pole barn electrician should be doing when they get there. Whether you are building a 30×40 hobby shop or a 60×120 machine shed with three-phase welders, the fundamentals are the same. Get the service right, size the feeder correctly, plan your circuits before the slab is poured, and you will have an outbuilding that works as hard as you do.
Bright Haven Electric has wired pole barns, shops, and agricultural outbuildings across our 10-county service area for over two decades. This guide reflects what we see in the field — not theory from a textbook.
Planning Your Outbuilding Electrical Service
The single most important decision in pole barn wiring happens before a single wire is pulled: how much power do you need — now and in five years? Undersizing the service to save money today guarantees an expensive upgrade later. Here is how to think about it:
Sub-Panel Sizing
A hobby shop with lighting and a few outlets needs a 60-amp sub-panel minimum. A working shop with a welder, air compressor, and dust collection needs 100 amps. A full machine shop or agricultural building with three-phase equipment typically requires 200 amps or a dedicated transformer. Always size for what you will need in five years — not what you need today. For high-demand farm shops or grain-handling sites, integrating dedicated irrigation VFD upgrades provides critical energy savings and voltage stabilization.
Size for GrowthUnderground Feeder Runs
Most pole barns require an underground feeder from the house panel or meter to the outbuilding sub-panel. NEC requires direct-burial cable (UF-B) at 24″ depth minimum, or conduit (PVC Schedule 40 or rigid) at 18″ minimum. Longer runs mean larger wire to compensate for voltage drop — a 200-foot run at 100 amps typically requires 1/0 AWG copper or 2/0 aluminum.
Voltage Drop MattersCircuit Planning
Plan your circuits before the concrete is poured and the metal is up. Welding outlets (50A/240V), air compressor (30A/240V), dust collection, overhead lighting, convenience outlets, and exterior security lighting all need dedicated or shared circuits planned from the start. Running conduit through a finished pole barn ceiling is ten times harder than stubbing it up through the slab.
Plan Before You PourGrounding & Bonding
Outbuilding sub-panels require a separate grounding electrode system — typically two ground rods driven at least 6 feet apart. The neutral and ground buses must be separated in the sub-panel (unlike the main panel). This is the most commonly failed inspection item on outbuilding wiring. Metal buildings also require bonding of the steel frame to the grounding system.
Top Inspection Failure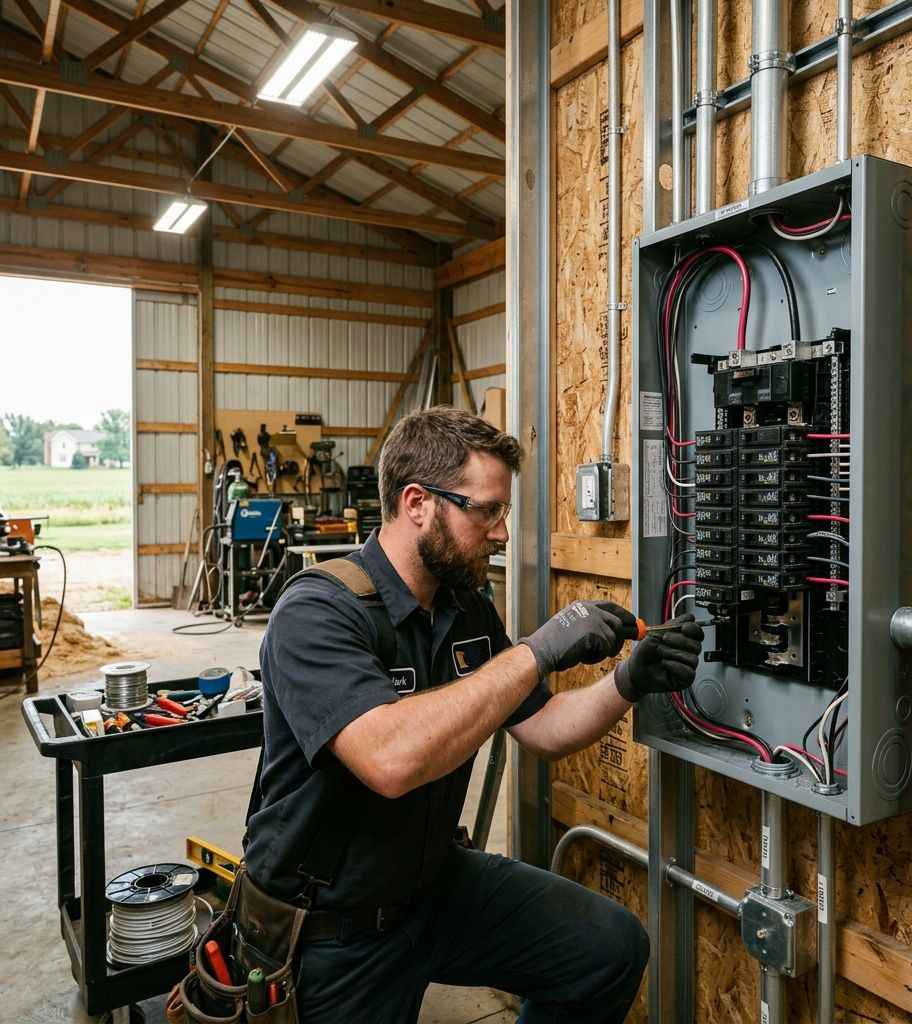
Common Pole Barn Electrical Configurations
Not every pole barn needs the same service. Here are the four most common configurations we install across West Central Minnesota, from basic to full commercial:
Configuration 1: Basic Hobby Shop (60A Service)
The Weekend Workshop
For woodworking, small projects, vehicle storage with lighting, and seasonal use. Typical building: 24×32 to 30×40.
- 60-amp sub-panel — 12 to 16 spaces, fed from the house main panel
- 4–6 general-purpose 20A circuits — outlets around the perimeter at workbench height
- 2 dedicated lighting circuits — overhead LED high-bays and task lighting
- 1 exterior circuit — security lighting and a weatherproof outlet
- GFCI protection — required on all receptacles in an unfinished building (NEC 210.8)
Configuration 2: Working Shop (100A Service)
The Serious Workshop
For welding, fabrication, automotive work, and heavy-duty power tools. Typical building: 30×50 to 40×60.
- 100-amp sub-panel — 20 to 30 spaces, dedicated feeder from the meter or main panel
- 1–2 welding outlets (50A/240V NEMA 6-50) — dedicated circuits for MIG, TIG, or stick welders
- 1 air compressor circuit (30A/240V) — for a 5–7.5 HP stationary compressor
- 6–8 general-purpose 20A circuits — outlets on all walls, including ceiling drops
- Dust collection circuit (20A/240V) — if running a central dust system
- LED high-bay lighting — 2 circuits, typically 8–12 fixtures for proper coverage
- Exterior security lighting — motion-activated LED floods on all four corners
Configuration 3: Agricultural Building (200A Service)
The Farm Machine Shop
For full-scale farm operations — equipment maintenance, grain handling support, livestock infrastructure. Typical building: 40×80 to 60×120.
- 200-amp sub-panel or dedicated meter — may require utility coordination for a new service drop
- Multiple 240V circuits — welders, plasma cutters, hydraulic presses, and large compressors
- Three-phase power — required for equipment like large lathes, milling machines, and grain handling motors
- Phase converter or VFD — if utility three-phase is not available at the site (common in rural MN)
- Agricultural ventilation circuits — exhaust fans, heaters, and environmental controls
- Fuel pump and grain dryer circuits — dedicated, code-compliant, with proper disconnect switches
- Explosion-proof fixtures — required in areas with combustible dust or fuel vapors per NEC Article 500
Configuration 4: Commercial Outbuilding (200A+ / 3-Phase)
The Commercial Operation
For commercial shops, fleet maintenance, contract manufacturing, or agricultural processing. Requires engineered plans and utility coordination.
- 400-amp+ service or dedicated transformer — utility will size based on your load calculation
- Three-phase distribution panel — for motors, CNC equipment, and industrial compressors
- Fire alarm and emergency lighting — required for commercial occupancy per Minnesota State Building Code
- Code-required disconnects — at all equipment, at the building entrance, and at the meter
- Engineered load calculation — required by the State Electrical Inspector before the permit is issued
“The number one mistake I see is someone who builds a beautiful 40×60 shop, puts in a 60-amp panel to save a few hundred dollars, and then calls us a year later because they can not run their welder and compressor at the same time. We upgrade more undersized outbuilding panels than anything else. Size it right the first time — the wire in the ground is the expensive part, not the panel.” — Chadwick Ferguson, Master Electrician & Co-Owner, Bright Haven Electric LLC
NEC Code Requirements for Outbuilding Wiring
Minnesota enforces the 2023 National Electrical Code (NEC) statewide. Pole barns, detached garages, and agricultural outbuildings fall under specific NEC articles that differ from residential house wiring. Here are the code requirements that matter most:
Critical NEC Articles for Outbuildings
- Separate grounding electrode required (NEC 250.32). Every detached building with a sub-panel must have its own grounding electrode system — minimum two ground rods, 8 feet long, driven at least 6 feet apart. The neutral and ground buses must be isolated in the sub-panel. This is not optional and is the most common inspection failure.
- GFCI protection on all 125V receptacles (NEC 210.8). In unfinished spaces — which includes most pole barns — every 15A and 20A, 125V receptacle requires GFCI protection. This applies to interior and exterior outlets. Use GFCI breakers in the sub-panel for the cleanest installation.
- Disconnecting means at the building (NEC 225.31). The outbuilding must have a disconnect switch or main breaker at or near the point where the feeder enters the building. A main-breaker sub-panel satisfies this requirement. A main-lug-only panel does not — you would need a separate disconnect.
- Underground feeder burial depth (NEC Table 300.5). Direct-burial UF-B cable requires 24″ minimum cover. PVC conduit requires 18″ minimum. Rigid metal conduit requires 6″ minimum. Under driveways, concrete, or areas subject to vehicle traffic, add 6″ to all minimums. We always recommend conduit over direct burial — it protects the wire and allows future upgrades without re-trenching.
- Voltage drop calculation (NEC 210.19 Informational Note). NEC recommends no more than 3% voltage drop on branch circuits and 5% total from the utility transformer to the outlet. On a 200-foot run, this often requires upsizing the feeder conductor by one or two sizes. A 100-amp feeder at 200 feet in aluminum typically needs 2/0 AWG minimum — not the #2 that ampacity tables alone would allow.
- Agricultural building requirements (NEC Article 547). Buildings housing livestock, storing hay, or handling grain are classified as agricultural buildings and require specific wiring methods: dust-tight and corrosion-resistant equipment, proper separation of grounding and bonding conductors, and equipotential bonding planes in livestock confinement areas to prevent stray voltage.

5 Costly Mistakes to Avoid
After wiring hundreds of outbuildings, we see the same mistakes repeated. Each one costs more to fix after the fact than it would have cost to do correctly from the start:
Undersized Service
Installing a 60-amp panel when a 100-amp is needed saves $200 today and costs $3,000 to upgrade later — because the underground feeder has to be replaced too. The panel itself is the cheapest component. The trench and wire are the expensive parts. Size it right once.
Most Common MistakeNo Permit or Inspection
Minnesota requires an electrical permit for all new outbuilding wiring. Skipping the permit means no inspection — which means no one checks whether the grounding, feeder sizing, and GFCI protection meet code. Insurance companies can deny fire claims on unpermitted electrical work. It is not worth the risk.
Insurance RiskBonding the Neutral in the Sub-Panel
In a sub-panel, the neutral bus and ground bus must be separated — the bonding screw or strap must be removed. Bonding neutral to ground in a sub-panel creates parallel paths for current on the grounding conductor, which can energize metal building frames and cause stray voltage on livestock operations.
Shock & Stray Voltage HazardIgnoring Voltage Drop
A 150-foot underground run with undersized wire delivers low voltage to your equipment. Your welder arcs weakly, your compressor motor overheats, and your LED lights flicker. Voltage drop is not a suggestion — it is physics. Calculate it before you buy wire, or your electrician will do it for you.
Equipment Damage RiskPoor Lighting Layout
Putting two light fixtures in a 40×60 shop creates shadows everywhere you actually work. LED high-bays are inexpensive — plan for 50+ lumens per square foot in work areas. Mount them on separate circuits from outlet circuits so a tripped breaker does not leave you in the dark with a running saw.
Easy to Get RightA Note on DIY Pole Barn Wiring
- Minnesota law allows homeowners to wire their own primary residence — but outbuildings and detached structures still require a licensed electrician in many jurisdictions
- Even where homeowner wiring is permitted, the State Electrical Inspector still inspects the work to the same NEC standard as a licensed contractor
- Sub-panel installations, underground feeder runs, and three-phase work involve calculations and techniques that are not covered in DIY guides — mistakes create fire and shock hazards that may not be apparent for months or years
- Insurance companies increasingly require proof of permitted, inspected electrical work for outbuilding coverage — unpermitted work can void your policy
Pole Barn Electricians — West Central Minnesota
Bright Haven Electric LLC wires pole barns, machine shops, and agricultural outbuildings across West Central Minnesota. From a 30×40 hobby shop near Glenwood to a 60×120 machine shed outside Granite Falls, we handle the full scope — underground feeder, sub-panel, circuits, lighting, and inspection coordination.
We serve property owners across our 10-county service area:
Building a Pole Barn? Get the Electrical Right.
From sub-panel sizing to underground feeder runs, we handle the full scope of outbuilding electrical — permitted, inspected, and built to last. Request a quote before you break ground.
It depends on how you use the building. A basic hobby shop needs a 60-amp sub-panel minimum. A working shop with a welder and compressor needs 100 amps. An agricultural building or machine shop with three-phase equipment typically requires 200 amps or more. Always size for future use — upgrading the underground feeder later costs significantly more than installing the right size initially. A licensed electrician will perform a load calculation to determine the correct size for your specific equipment list.
Per the 2023 NEC Table 300.5, direct-burial cable (UF-B) requires a minimum of 24 inches of cover. PVC conduit requires 18 inches minimum. Rigid metal conduit requires only 6 inches. Under driveways or areas with vehicle traffic, add 6 inches to all minimums. We recommend PVC conduit over direct burial because it protects the wire from damage and allows future conductor upgrades without re-trenching.
Yes. Minnesota requires an electrical permit for all new outbuilding wiring, including pole barns, detached garages, and agricultural buildings. The work must be inspected by the Minnesota State Electrical Inspector and pass to the current NEC code. Skipping the permit means no inspection — and insurance companies can deny claims on unpermitted electrical work. Contact Bright Haven Electric and we handle the permit process as part of the project.
Yes. Per NEC 250.32, every detached building with a sub-panel requires its own grounding electrode system — typically two ground rods, 8 feet long, driven at least 6 feet apart. The neutral bus and ground bus in the sub-panel must also be separated (the bonding screw must be removed). This is the most commonly failed inspection item on outbuilding wiring projects.
Costs vary significantly based on the service size, feeder run distance, and circuit count. A basic 60-amp hobby shop with a short underground run typically costs $2,500–$4,500. A 100-amp working shop with welding outlets runs $5,000–$9,000. A 200-amp agricultural building with three-phase power can range from $10,000–$20,000+ depending on equipment requirements and utility coordination. Request a detailed estimate — we provide transparent, itemized quotes for every project.
Why Are My Lights Flickering?
8 real causes — from a 10-second bulb fix to a failing service neutral that could burn your house down. Know when to fix it yourself and when to call a licensed electrician.
Flickering lights are one of the most common electrical complaints homeowners bring to us — and one of the most misunderstood. A light that flickers once when the AC kicks on is not the same problem as lights that dim across half your house during a windstorm. One is a minor nuisance. The other is a symptom of a life-threatening electrical failure happening right now inside your walls or at your service entrance.
The challenge is that flickering lights have at least eight distinct causes, and they range from a 10-second DIY fix (tighten a loose bulb) to an emergency that requires your utility company and a licensed electrician immediately. This guide walks you through every cause, shows you how to identify which one you have, and tells you exactly when it is safe to fix it yourself — and when it is not.
If you are experiencing flickering or dimming lights right now, start with the 3 emergency patterns below before reading the full guide. Some flickering patterns require immediate action.
The 8 Real Causes of Flickering Lights
We have organized these from simplest (fix it yourself in seconds) to most dangerous (call immediately). Each card tells you the cause, what you will see, and whether it is a DIY fix or a job for a licensed electrician.
1. Loose or Wrong-Type Bulb
What you see: A single light flickers intermittently. Other lights in the room are fine. The fixture works normally with a different bulb.
Why it happens: The bulb is not fully seated in the socket, or you are using an incompatible LED bulb in a fixture designed for incandescent. Some cheap LED bulbs also flicker at the end of their lifespan due to failing driver circuits.
The fix: Turn the light off, let the bulb cool, and tighten it. If it is an LED, try a different brand — look for “dimmable” or “flicker-free” on the packaging.
2. Dimmer Switch Incompatibility
What you see: LED bulbs flicker constantly or buzz when connected to a dimmer switch. The flickering may change intensity as you adjust the dimmer.
Why it happens: Older dimmer switches were designed for incandescent bulbs and use a technology called TRIAC dimming. Many LED bulbs require a different dimming method. When the dimmer and bulb are incompatible, the LED driver cannot maintain a stable output and the bulb flickers or strobes.
The fix: Replace the dimmer with an LED-compatible dimmer switch. Check the LED manufacturer’s compatibility list. This is a straightforward swap if you are comfortable working with switches — otherwise call a pro.
3. Overloaded Circuit
What you see: Lights dim briefly when a high-draw appliance turns on — a space heater, hair dryer, microwave, or window AC unit. The dimming lasts 1–2 seconds and then the lights return to normal.
Why it happens: The appliance draws a large inrush current when its motor or heating element starts. If the appliance shares a circuit with the lights, the sudden current draw causes a brief voltage drop on that circuit, and the lights dim momentarily.
The fix: Occasional, brief dimming on the same circuit as a large appliance is usually normal. However, if the dimming is severe, affects other circuits, or the breaker trips, the circuit is overloaded. A licensed electrician can install a dedicated circuit for the high-draw appliance.
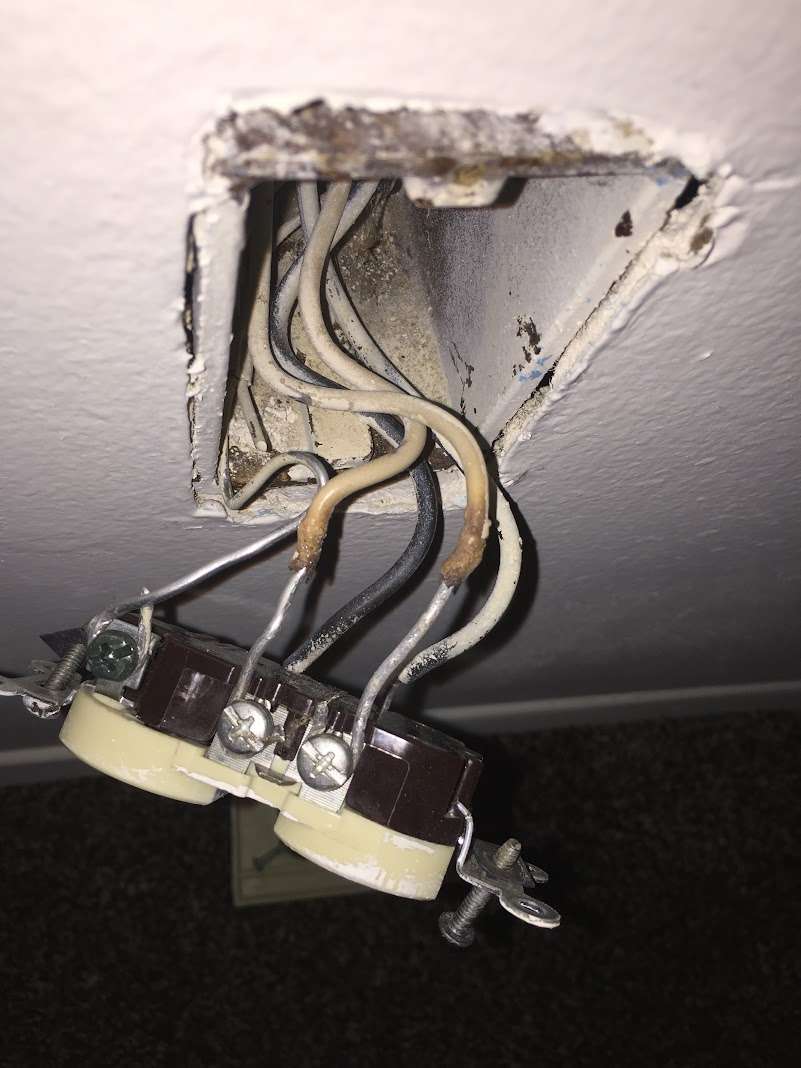
4. Loose Wiring at Outlet or Fixture
What you see: A specific light fixture or outlet flickers, buzzes, or works intermittently. The problem seems localized to one point. Jiggling the fixture or outlet may change the flickering.
Why it happens: A wire connection inside the outlet box, switch box, or light fixture junction box has come loose. Loose connections create high-resistance points where electricity arcs across the gap. This generates heat and is a leading cause of electrical fires.
The fix: Do not ignore this. A loose connection that arcs is a fire hazard. Call a licensed electrician to open the box, identify the loose connection, and re-terminate it properly. This is not a DIY repair — live wiring is involved.
5. Aluminum Wiring Connections Oxidizing
What you see: Lights flicker in multiple rooms, often worsening over months or years. Outlets feel warm. Switches make crackling sounds. The home was built between 1965 and 1975.
Why it happens: Homes wired with aluminum branch circuit wiring develop oxide buildup at every connection point. Aluminum expands and contracts more than copper with each heating cycle, loosening connections over time. The oxide layer increases resistance, which generates more heat, which loosens connections further — a progressive failure cycle that ends in fire.
The fix: A licensed electrician performs aluminum wiring remediation — installing AlumiConn connectors or COPALUM crimps at every connection point in the home. This is a multi-day project but eliminates the failure mechanism entirely.
6. Failing Circuit Breaker
What you see: Lights on one circuit flicker or dim repeatedly. The breaker may trip occasionally — or it may be warm to the touch. The flickering has gotten worse over time.
Why it happens: Circuit breakers have a finite lifespan. Internal contacts wear out, springs weaken, and the breaker loses its ability to maintain a solid connection with the bus bar. A breaker that is loose in its bus slot or has corroded contacts creates an intermittent connection — the lights flicker as the circuit makes and breaks contact. See our guide to dangerous electrical panel warning signs.
The fix: A licensed electrician replaces the failing breaker and inspects the bus bar for damage. If the panel is a recalled brand, full panel replacement may be necessary.
7. Loose Service Entrance Neutral
What you see: Lights throughout the house flicker, dim, or surge — some getting brighter while others dim simultaneously. The flickering may worsen during wind or storms. Light bulbs burn out frequently. Electronics malfunction or die prematurely.
Why it happens: The neutral conductor at your service entrance (the connection between your panel and the utility transformer) has come loose or corroded. This causes an imbalanced voltage between the two 120V legs of your home’s electrical system. One leg gets over-voltage (lights get brighter, electronics fry) while the other gets under-voltage (lights dim). This is called a floating neutral or open neutral — and it is an emergency.
The fix: Call your utility company AND a licensed electrician immediately. A floating neutral can send 180V+ through circuits designed for 120V, destroying appliances and creating extreme fire risk. Do not wait.
8. Utility-Side Voltage Fluctuation
What you see: All lights in the house flicker simultaneously and briefly — usually for a fraction of a second. It happens at random, sometimes multiple times a day, sometimes weeks apart. Your neighbors may experience the same thing.
Why it happens: The utility’s transformer, distribution lines, or switching equipment is experiencing load fluctuations, tree contact, or equipment degradation. Storms, ice loading, and high-demand periods can exacerbate utility-side voltage sags. In rural West Central Minnesota, long distribution runs to remote properties are especially susceptible.
The fix: Report the issue to your electric cooperative or utility. If it persists, a whole-house surge protector will protect your electronics from voltage transients, and a power conditioning system can stabilize the voltage entering your home.
3 Flickering Patterns That Mean Call an Electrician NOW
- Lights dim AND brighten simultaneously in different rooms — This is the signature of a loose or open service neutral. Some circuits get over-voltage while others get under-voltage. Electronics are being damaged in real time. Call your utility company and a licensed electrician immediately
- Flickering accompanied by a burning smell, buzzing, or warm outlets/switches — These are signs of active arcing at a connection point. Arcing generates temperatures exceeding 10,000°F at the arc site — hot enough to ignite wood framing and insulation inside your walls. Turn off the affected circuit at the breaker panel and call a licensed electrician
- Flickering that is getting progressively worse over weeks or months — Progressive flickering indicates a connection that is deteriorating over time — typically aluminum wiring oxidation, a corroding bus bar connection, or a failing neutral. This will not fix itself. It will continue to degrade until it causes a fire or equipment failure. Schedule an electrical safety inspection as soon as possible
What to Check First: Diagnostic Flowchart
Before you call an electrician, you can narrow down the cause significantly by answering a few questions. This diagnostic sequence is what we walk through on every flickering-lights service call:
- Is it one fixture or multiple?
If only one light flickers, the problem is local — check the bulb, the fixture, or the switch controlling it (Causes 1–2). If multiple lights flicker, skip to Step 3
- Does it happen on a dimmer?
If the flickering fixture is on a dimmer switch, replace the dimmer with an LED-compatible model before calling an electrician. This solves the majority of single-fixture flickering complaints (Cause 2)
- Does it happen when an appliance turns on?
If lights dim briefly when the AC, heater, or microwave starts — and only on the same circuit — this is likely an overloaded circuit (Cause 3). If the dimming affects lights on other circuits, the issue is at your panel or service entrance (Causes 6–7)
- Is it one circuit or the whole house?
If flickering is limited to one breaker’s circuit, the problem is a loose connection on that circuit or a failing breaker (Causes 4, 6). If the flickering is house-wide, go to Step 5
- Do some lights get brighter while others get dimmer?
This is the critical question. If yes — stop diagnosing and call your utility company and an electrician immediately. You have a loose or open neutral (Cause 7). If all lights flicker uniformly, it is likely a utility-side issue (Cause 8)
- Was the home built between 1965 and 1975?
If yes, and you are experiencing multi-room flickering, warm outlets, or crackling switches, you may have aluminum branch circuit wiring that is oxidizing at connection points (Cause 5). This requires professional evaluation
“The call I dread most is the loose neutral. By the time the homeowner notices lights surging and dimming, the imbalanced voltage has already been cooking their electronics and appliances for hours or days. I have seen $15,000 in appliance damage from a single corroded neutral connection at the weatherhead. That is why I tell people: if lights get brighter and dimmer at the same time in different rooms, do not Google it — call your utility and call us. Right now.” — Chadwick Ferguson, Master Electrician & Co-Owner, Bright Haven Electric LLC
Related Guides
Flickering lights often lead to deeper electrical issues. These companion guides cover the most common next steps:
- Is Your Electrical Panel Dangerous? 7 Warning Signs — If your breaker is the cause, this guide covers recalled brands and when to replace your panel
- How to Reset a GFCI Outlet & Tripped Breaker — If flickering is accompanied by tripped breakers or dead outlets
- Aluminum Wiring Remediation Safety Guide — If your home was built in the late 1960s–70s and has aluminum branch circuits
- Whole-Home Surge Protection Guide — If utility-side voltage fluctuations are damaging your electronics
- Circuit Breaker Tripping: Overloads & Short Circuits — If your flickering lights are accompanied by breaker trips
- Home Electrical Safety Inspection — A 72-point professional inspection to identify the root cause of persistent flickering and other hidden issues
- Zero-Cost Ways to Save on Electricity — If overloaded circuits are causing flickering, these load-reduction strategies can help while you plan upgrades
Flickering Light Troubleshooting Across West Central Minnesota
Bright Haven Electric LLC diagnoses and repairs flickering lights, loose connections, panel failures, and service entrance problems across our 10-county service area. From aluminum wiring remediation in 1970s farmhouses to loose neutral repairs on rural lake properties — we have seen and fixed every cause on this list.
We serve homeowners throughout our 10-county service area including:
Flickering Lights FAQ
Below are the most common questions we receive about flickering and dimming lights from homeowners across West Central Minnesota.
Yes. Flickering lights caused by loose wiring connections, aluminum wiring oxidation, or failing breakers indicate active arcing or high-resistance faults — both of which generate extreme heat at the fault point. Arcing temperatures can exceed 10,000°F, which is hot enough to ignite wood framing and insulation inside your walls. If your flickering is accompanied by a burning smell, warm outlets, buzzing sounds, or is getting progressively worse, it is a fire hazard that requires immediate professional evaluation. Not all flickering is dangerous — a loose bulb or dimmer incompatibility is harmless — but you must identify the cause to know the difference.
When your AC compressor starts, it draws a large inrush current — typically 3–5 times its running amperage — for a fraction of a second. This sudden current draw causes a brief voltage drop on the circuit (and sometimes on the entire panel), which makes lights dim momentarily. A brief, slight dim (less than 1 second) when a large motor starts is generally normal and not a safety concern. However, if the dimming is severe (lights visibly drop in brightness), prolonged (more than 1–2 seconds), or affects lights on other circuits, your panel may be undersized, the circuit may be overloaded, or there may be a loose connection at the panel. A licensed electrician can evaluate whether a dedicated circuit or panel upgrade is needed.
Your home’s electrical system is fed by two 120-volt “legs” that share a common neutral conductor. The neutral keeps both legs balanced at 120V. When the neutral connection becomes loose or breaks (at the meter base, weatherhead, or panel), the voltage between the two legs becomes unbalanced. One leg may rise to 150V, 180V, or higher while the other drops proportionally. This is called a floating neutral or open neutral. The result: lights on one circuit get dangerously bright while lights on the other circuit dim. Appliances and electronics connected to the over-voltage leg can be destroyed instantly. A floating neutral is an emergency — it can cause thousands of dollars in appliance damage and create a severe fire risk. If you see lights getting brighter and dimmer simultaneously in different rooms, call your utility company and a licensed electrician immediately.
Brief, uniform flickering during storms is usually caused by utility-side events — tree branches contacting power lines, wind-induced conductor slap, or switching operations as the utility manages load. This is common in rural areas like West Central Minnesota where overhead distribution lines run through wooded corridors. While storm-related flickering is generally not a sign of a problem inside your home, it does indicate that your electrical system is experiencing voltage transients. A whole-house surge protector is strongly recommended to protect your appliances and electronics from storm-induced surges. However, if the flickering is severe, causes lights to brighten in some rooms while dimming in others, or continues after the storm passes, the storm may have damaged your service entrance or loosened your neutral connection — which requires immediate professional evaluation.
Aluminum branch circuit wiring was widely used in homes built between approximately 1965 and 1975 due to a copper shortage. You can identify it by checking the wiring at your electrical panel (if the dead front is removed by a licensed electrician) or at an outlet or switch (with the breaker off). Aluminum wire is silver-colored, while copper is orange or brown. The wire jacket may also be printed with “AL” or “ALUMINUM.” If you are unsure, a licensed electrician can confirm whether your home has aluminum wiring during an electrical safety inspection. Aluminum wiring is not inherently dangerous — but the connections where aluminum meets copper devices must be properly remediated with AlumiConn connectors or COPALUM crimps to prevent oxidation, overheating, and fire.
It depends on the cause. Call your utility company if: the flickering is house-wide, uniform, and your neighbors are experiencing the same issue — this suggests a utility-side problem. Call a licensed electrician if: the flickering is limited to certain rooms or circuits, is accompanied by burning smells or warm outlets, or involves some lights getting brighter while others dim. Call both if you suspect a loose neutral — this can involve a failure at the utility’s meter connection or at your service entrance, and both the utility and an electrician may need to work together to resolve it. When in doubt, start by calling a licensed electrician — we can determine whether the problem is on your side or the utility’s side and coordinate accordingly.
Bright Haven Electric — Safety-First Electrical Work
Licensed, insured, and safety-trained electrical services across West Central Minnesota.
Stop Guessing. Get Answers.
Flickering lights have eight causes — but only one matters: yours. A diagnostic service call gives you a definitive answer and a clear path forward. No guessing, no Googling, no hoping it goes away.
Fall Protection Is Not Optional. A Local Boom Truck Incident Reminds Us Why.
A lineman was thrown from a boom truck bucket near Madison, MN on April 24, 2026 while attempting to lift a traffic signal for an oversized load. He was not wearing a fall protection harness or was it was not hooked up.
What Happened
Near the intersection of US-75 and US-212 in Hamlin Township — roughly 5 miles south of Madison, Minnesota — a boom truck worker was attempting to lift a traffic signal mast arm to clear an oversized commercial load. The jib line snapped under the load, the boom whipped violently, and the worker was launched from the bucket.
He was not wearing a fall protection harness or was it was not hooked up. This happened in our service area — less than an hour from most of our job sites.
“Safety rules are written in blood. Every OSHA regulation exists because someone was hurt or killed doing exactly what the rule now prohibits.” — Common saying in the trades
What Went Wrong — Multiple Failures
This was not a single mistake. It was a chain of failures:
- No fall protection harness. OSHA requires fall protection for any work above 6 feet. Bucket truck baskets have harness anchor points for exactly this scenario. The worker was unrestrained.
- Using a jib to lift a fixed structure. A jib crane is rated for discrete, free-hanging loads under 500–1,000 lbs. A traffic signal mast arm is steel bolted to a concrete foundation — the force increases with deflection, far exceeding jib capacity.
- Worker in the bucket during a high-load lift. The catapult effect — exactly what happened — is a known and documented hazard. The boom stores energy like a spring and releases it violently when the load breaks free.
- Route planning failure. The oversized load should never have reached this intersection without the clearance issue being addressed in advance.
What OSHA Requires for Aerial Lifts
- 29 CFR 1926.453(b)(2)(v) — Body harness and lanyard attached to the boom or basket at all times
- 29 CFR 1926.501(b)(1) — Fall protection required at 6 feet or more above a lower level
- Restraint lanyards recommended — Short enough to prevent ejection, not just arrest a fall after it
- Employer responsibility — Employer must provide equipment, ensure it is worn, and train workers. Failure is an employer violation.
How We Handle Fall Protection at BHE
We do this kind of work. We work from bucket trucks, boom lifts, ladders, and rooftops. When we see an incident like this, we do not think “that guy was careless.” We think: “that could be any of us on the wrong day with the wrong shortcut.” When operating high-voltage or complex installations, performing a thorough farm electrical safety audit is the first step to mapping utility lines and avoiding structural contact.
- Harness on before the bucket goes up. Every time. No exceptions. Even for “just a second.”
- Equipment inspected before every use. Harnesses, lanyards, and anchors checked for wear and damage each shift.
- No improvised lifting. If the equipment is not rated for it, we stop and get the right tool.
- Right to refuse unsafe work. Any crew member can refuse a task they believe is unsafe. The job is never more important than going home.
Fall Protection FAQ
Yes. OSHA standard 29 CFR 1926.453(b)(2)(v) requires workers in aerial lifts to wear a body harness with a lanyard attached to the boom or basket at all times. This applies to boom trucks, bucket trucks, cherry pickers, and all MEWPs.
The catapult effect occurs when a boom under tension is suddenly released, causing it to whip violently. This can happen when a boom snags on an obstruction, a jib line snaps, or a tire drops off a curb while extended. The force can eject an unrestrained worker at high velocity. A restraint lanyard is the primary defense.
Boom trucks with a jib crane can lift loads within rated capacity — typically 500 to 1,000 lbs. The jib is designed for free-hanging loads like transformers and crossarms, not fixed structures bolted to the ground. Lifting a fixed structure creates a spring-load that increases with deflection, quickly exceeding capacity.
Ask about fall protection policy and training. Look for documented training, inspected harnesses, a written safety program, and a culture where workers can refuse unsafe tasks. If you see a contractor working at height without fall protection, that tells you everything about their standards on work you cannot see.
Bright Haven Electric — Safety-First Electrical Work
Licensed, insured, and safety-trained electrical services across West Central Minnesota.
Need Electrical Work Done Right — and Safe?
No shortcuts. No improvisation. Just professional work from a crew that takes safety personally.